Gallery Download Tutorial About
![]()
|
|
JBit è un ambiente di programmazione completo ed è più complicato di una tipica applicazione per cellulari. Questo tutorial ti assisterà nei primi passi del suo utilizzo. La prima cosa da capire è che, quando stai scrivendo un programma usando JBit, non stai scrivendo un programma per il tuo cellulare, ma per la JBit Virtual Machine (MicroIO Edition), o VM. Qui c'è un'immagine della VM e come puoi vedere assomiglia a un brutto cellulare. Ora, la VM potrà anche essere brutta, ma di sicuro non è un cellulare. Innanzi tutto, con la VM non puoi fare o ricevere chiamate, ne spedire o ricevere SMS. Inoltre lo schermo può mostrare solo una matrice di 10x4 caratteri ed il tastierino supporta solo i tasti standard (ovvero: 0-9, * e #). Visto che la VM non può fare le cose di un cellulare, a che cosa può essere utile? Beh,a dire il vero quasi a niente. Però imparare a programmarla può aiutarti a capire come funzionano i computer. I computer sono macchine complicate e la loro essenza è nascosta da molti livelli di astrazione, ma alla fine hanno un'essenza che non è molto più complicata della VM. |
|||||||||
|
|
Un'altra cosa da capire è la differenza tra la VM e JBit. JBit include la VM, ma non è solo quella. Include anche strumenti per aiutarti a scrivere e organizzare programmi per la VM. A dire il vero, non puoi accedere alla VM senza prima avere scritto un programma per essa. Infatti, la VM non ha niente di paragonabile al Desktop; è completamente vuota. Quindi il nostro primo compito sarà quello di scrivere un programma minimo, in modo da poter dare uno sguardo alla VM. Seleziona Editor dalla lista. |
|||||||||
|
|
L'Editor ha bisogno di sapere quanto è grande il programma. Per ora non è essenziale e quindi possiamo semplicemente confermare 4 Code Pages (it. Pagine di codice) e 3 Data Pages (it. Pagine dati). Seleziona OK (o Conferma, o simili). In alcuni cellulari OK è assegnato direttamente a un tasto, mentre in altri OK è disponibile usando un menu (es. Opzioni o Menu). Se non vedi la schermata Size (New) (it. Dimensione - Nuovo) probabilmente vuol dire che hai già un programma caricato e devi riavviare JBit. |
|||||||||
|
|
Dovresti vedere una matrice di zeri; questo è il programma. Ci ritorneremo dopo. Per ora vogliamo solo arrivare rapidamente alla VM. Seleziona Debug. |
|||||||||
|
|
Ecco la VM. Come vedi non assomiglia per niente all'immagine sopra. Questo perchè stai guardano dentro la VM! Premi # per passare alla visuale esterna. |
|||||||||
|
|
Adesso stai guardando lo schermo della VM. Non ha molto senso mostrarti il tastierino della VM, visto che quello del cellulare può fare le veci di quello della VM. C'è una piccola complicazione. Se avessimo attivato la VM normalmente, si sarebbe fermata subito, perchè il programma è vuoto. Invece, abbiamo attivato la VM in una modalità "congelata" che ci permette di ispezionarla. In questa modalità, è più usuale guardare lo schermo che usare il tastierino, quindi, in questo momento, il tastierino del cellulare non stà facendo le veci di quello della VM, ma è usato solo per ritornare alla visuale interna. Premi # un'altra volta per ritornare alla visuale interna. |
|||||||||
|
|
Vediamo cosa c'è dentro la VM. Hai probabilmente già sentito il termine CPU (Central Process Unit, it. Unità di Elaborazione Centrale), visto che è uno dei criteri di scelta quando si compra un computer. La CPU usata dalla VM è fondamentalmente un 6502; una CPU popolare negli anni 70 e 80. Paragonata ad una moderna CPU, è più piccola e più lenta, ma, da un punto di vista teorico, non meno potente. Imparare a conoscere la CPU è lo scopo principale di JBit e richiederà un po' di tempo. Possiamo cominciare così: la CPU è un agente che opera in un mondo virtuale in nostra vece. Prima di farci rappresentare dalla CPU, opereremo un po' in questo mondo virtuale direttamente. Premi 0 per passare alla visuale MEMory (it. memoria). |
|||||||||
|
|
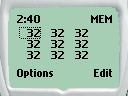
A differenza del mondo reale, dove siamo liberi di posizionare gli oggetti come ci pare, in questo mondo virtuale, gli oggetti sono posizionati in celle (ing. cells) e le celle sono disposte in un'unica riga. Inoltre, a differenza del mondo reale, dove ci sono vari tipi di oggetti, in questo mondo virtuale, c'è solo un tipo di oggetto: il byte, un piccolo intero dai valori compresi tra 0 e 255. Infine, a differenza del mondo reale, questo mondo virtuale è finito. Ci sono esattamente 65536 celle. Per organizzare meglio questa lunga sequenza di celle, la dividiamo in 256 segmenti (chiamate pagine, ing. pages) di 256 celle ciascuna. Questo ha il vantaggio di consentirci di riferirci alla posizione delle celle usando due byte: il numero di pagina (usando 0 per la prima pagina e 255 per l'ultima) e la posizione (o scostamento, ing. offset) all'interno della pagina (usando 0 per la prima posizione e 255 per l'ultima). Questa coppia di byte è chiamata indirizzo (ing. address) della cella e la scriveremo come due numeri separati dai due punti. Per esempio, la prima cella è all'indirizzo 0:0, l'ultima è all'indirizzo 255:255 e la 260esima è all'indirizzo 1:3 (ovvero, la quarta cella della seconda pagina). Spesso scriveremo semplicemente la cella Pagina:Scostamento per riferirci alla cella di indirizzo Pagina:Scostamento. La visuale MEMoria è una visuale su questo mondo virtuale. Per sfruttare al meglio il piccolo schermo di un tipico cellulare le celle sono mostrate in una matrice, ma tieni presente che in realtà sono disposte in una singola riga. La cella corrente (ovvero la cella che stiamo esaminando in questo momento) è indicata dal cursore. Puoi muovere il cursore usando 4 (o sinistra) per andare alla cella precedente e 6 (o destra) per andare a quella successiva. Puoi anche usare 2 (o su) e 8 (o giù). Vai alla cella 3:25 e seleziona Edit (it. Modifica). |
|||||||||
|
|
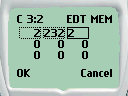
Questa schermata ti permette di cambiare il contenuto di una cella. Inserisci 56 nel campo Value (it. Valore) e seleziona OK. |
|||||||||
|
|
Il contenuto della cella è cambiato. Muovi il cursore in giù fino a che la cella 3:25 non è più visibile (es. quando reggiungi 3:50) e poi ritorna alla cella 3:25. Puoi vedere che la cella ha mantenuto il valore che hai inserito. La cella 3:25, come la maggior parte delle celle è una cella di memoria (ing. memory) ovvero, una cella che semplicemente conserva il valore che vi viene inserito. Seleziona GoTo (it. VaiA). |
|||||||||
|
|
Questa schermata ti permette di muovere rapidamente il cursore in una cella particolare. Inserisci 2 nel campo Page, inserisci 40 nel campo Offset e seleziona OK. |
|||||||||
|
|
Le celle della pagina 2 non sono celle di memoria. Sono invece dei collegamenti a un dispositivo chiamato IO chip. In particolare, le celle dalla 2:40 alla 2:79 sono connesse allo schermo in questo modo:
     0  1  2  3  4  5  6  7  8  9
 40  .  .  .  .  .  .  .  .  .  .
 50  .  .  .  .  .  .  .  .  .  .
 60  .  .  .  .  .  .  .  .  .  .
 70  .  .  .  .  .  .  .  .  .  .
L'inserimento di un byte da 32 a 126 in una di queste celle provoca l'apparizione di un carattere sullo schermo, secondo la seguente tabella:
     0  1  2  3  4  5  6  7  8  9
 30           !  "  #  $  %  &  '
 40  (  )  *  +  ,  -  .  /  0  1
 50  2  3  4  5  6  7  8  9  :  ;
 60  <  =  >  ?  @  A  B  C  D  E
 70  F  G  H  I  J  K  L  M  N  O
 80  P  Q  R  S  T  U  V  W  X  Y
 90  Z  [  \  ]  ^  _  `  a  b  c
100  d  e  f  g  h  i  j  k  l  m
110  n  o  p  q  r  s  t  u  v  w
120  x  y  z  {  |  }  ~
|
|||||||||
|
|
Seleziona Edit, inserisci 88 nel campo Value e seleziona OK. |
|||||||||
|
|
Premi # per passare alla visuale esterna. Come puoi vedere il carattere X è visibile nell'angolo in alto a sinistra dello schermo. Su cellulari con un ampio display, il carattere sarà probabilmente un po' più verso il centro, visto che il display della VM è molto più piccolo di quello del cellulare. Adesso che abbiamo una comprensione migliore di cosa significa "operare in un mondo virtuale" siamo pronti per dare un altro sguardo alla CPU. Premi di nuovo # per tornare alla visuale interna e poi 0 per passare alla visuale CPU. |
|||||||||
|
|
La CPU può eseguire un numero limitato di azioni elementari chiamate istruzioni (ing. instructions) o operazioni (ing. operations). Per esempio: leggere un byte da una cella, scrivere un byte in una cella, sommare due byte, ecc... Un programma è fondamentalmente una lista di operazioni che la CPU deve eseguire per produrre il comportamento desidertato. La CPU prende le oprazioni da eseguire dalle celle, a cominciare dalla cella 3:0. Quello che per noi è solo un numero come tutti gli altri, per la CPU ha un significato particolare. Per esempio, 0 significa BRK (abbreviazione di BReaK, it. pausa) per la CPU. Il nome BRK viene dal fatto che, su un vero 6502, BRK poteva essere usato per sospendere il programma. Questa è una delle poche differenze tra un vero 6502 e la CPU della VM. Sulla CPU della VM, BRK causa la terminazione del programma. Le aree della CPU sono chiamate registri (ing. registers) invece di celle. Ne esamineremo solo alcuni qui. Prima di tutto, c'è il PC (o Contatore Programma, ing. Program Counter). Ha spazio per due byte e contiene l'indirizzo della cella contenente l'istruzione successiva da eseguire. Poi ci sono tre registri che hanno spazio per un solo byte ciascuno. Sono: l'Accumulatore (ing. Accumulator, abbreviato con A), X ed Y. |
|||||||||
|
|
Premi 0 per passare alla visuale MEMoria. Scrivi 232 nella cella 3:0. Ovvero: seleziona GoTo, inserisci 3 nel canpo Page, inserisci 0 nel campo Offset, seleziona OK, seleziona Edit, inserisci 232 nel campo Value e poi seleziona OK. Premi 0 per tornare alla visuale CPU. |
|||||||||
|
|
232 significa INX (abbreviazione di INcrement X, it. incrementa X) per la CPU. INX causa l'incremento di 1 del registro X. Se il registro X già contiene 255, viene resettato a 0. Premi 1 per avanzare di un passo (ovvero, fare eseguire un'operazione alla CPU). |
|||||||||
|
|
Come puoi vedere l'operazione è stata eseguita: il registro X adesso contiene 1 e il PC punta alla prossima cella (ovvero la cella 3:1, contenente l'istruzione successiva da eseguire). Adesso potremmo cambiare il contenuto della cella 3:1 e continuare così, ma questo non è il modo migliore di procedere. Scrivere sequenze di istruzioni è più comodo usando l'Editor. Premi 1 per avanzare di un passo e terminare il programma. |
|||||||||
|
|
Ti viene data un ultima'possibilità di guardare lo schermo, prima di spegnere la VM e ritornare all'Editor. Seleziona End (it. Fine). |
|||||||||
|
|
L'Editor è un editor modale, overro gli effetti della premuta di un tasto dipendono dalla modalità operativa corrente. Ci sono due modalità principali (NAVigation ed EDiTing, it. NAVigazione e modifica) combinate con due modalità secondarie (MEMoria e ASseMbly, it. MEMoria e ASseMblato). La modalità NAV MEM si comporta come la visuale MEMoria descritta sopra. Come sopra, puoi muovere il cursore usando 4 (o sinistra), 6 (o destra), 2 (o su) e 8 (o giù). La differenza è che non puoi raggiungere le celle oltre i confini del programma. Questo perchè, quando scrivi un programma, non stai modificando la memoria della VM, ma semplicemente un modello di byte che verrano usati successivamente per inizializzarla. |
|||||||||
|
|
Assicurati che il cursore sia in 3:0 e premi 5 (o il tasto centrale, in alcuni cellulari). La modalità EDT MEM permette la digitazione dei byte del programma "in loco" (ovvero, senza aprire una nuova schermata). Premi 2, *, 2, 3, 2 e 2. Nota quanto segue:
Se commetti un errore digitando la sequenza, puoi selezionare Cancel (it. Cancella) per svuotare il byte corrente. Se il byte corrente è già vuoto, selezionare Cancel ritorna al byte precedente. Se in fine hai raggiunto il primo byte e selezioni Cancel, tornerai alla modalità NAV MEM senza fare alcuna modifica al programma. Premi OK per confermare le modifiche e ritornare alla modalità NAV MEM. |
|||||||||
|
|
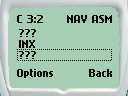
I primi tre byte del programma dovrebbero essere: 2, 232 e 2. Come abbiamo visto 232 significa INX, ma cosa significa 2? Premi #. |
|||||||||
|
|
La modalità NAV ASM consente la visione del programma come lo interpreterebbe la CPU. E' possibile muovere il cursore usando 2 (o su) e 8 (o giù) per scorrere il listato, ma non è possibile premere 5 per la modifica in loco. Quindi 2 significa ??? per la CPU. Beh, non è stato di grande aiuto. Lanciamo la VM (nel modo corretto questa volta) per vedere cosa succede. Premi *. |
|||||||||
|
|
Ecco quello che è successo:
INV.OP. è l'abbreviazione di opcode (it. codice operazionale) invalido. L'opcode è un byte che identifica il tipo di operazione da eseguire. Alcuni opcode (es. 232) hanno senso per la CPU, mentre altri (es. 2) no. Seleziona End per ritornare all'Editor e poi premi # per passare alla modalità NAV MEM. |
|||||||||
|
|
Posiziona il cursore in 3:0, premi 5 per passare alla modalità EDT MEM e poi premi # per passare alla modalità EDT ASM. |
|||||||||
|
|
La modalità EDT ASM consente di cercare un opcode valido. Premi 5 (jkL), 3 (Def) e 2 (Abc). |
|||||||||
|
|
Prima di proseguire, permettimi di riformulare la frase: 232 significa INX per la CPU.Senza usare la parola "significa" ("significa" potrebbe essere fuorviante e suggerire che la CPU capisce qualcosa): Quando la CPU legge l'opcode 232 da una cella, incrementa il registro X. L'etichetta di tre lettere INX è chiamata mnemonico (ing. mnemonic) e il suo unico scopo è quello di ricordare al programmatore quello che farà la CPU. Vediamo altri due opcode: 169 e 173. 169. Quando la CPU legge l'opcode 169 da una cella, rimpiazza il contenuto dell'Accumulatore con il contenuto della cella successiva alla cella contentente l'opcode. 173. Quando la CPU legge l'opcode 173 da una cella, rimpiazza il contenuto dell'Accumulatore con il contenuto du una cella specifica. L'indirizzo della cella è calcolato usando, come offset, il contenuto della cella successiva alla cella contentente l'opcode e, come pagina, il contenuto della cella successiva alla cella contentente l'offset. Le descrizioni sono un po' contorte, ma spero che sarà più chiaro con gli esempi quì sotto. Quello che è importante ora è notare una similarità tra i due opcode: in entrambi i casi, il contenuto dell'Accumulatore è rimpiazzato. Lo mnemonico corrispondente è LDA (abbreviazione dell'inglese LoaD Accumulator, dove load significa carica). Quì c'è un esempio per l'opcode 169: 169 65 Da notare che, a differenza di BRK e INX, un byte non è sufficiente per specificare il comportamento della CPU. Se si vuole rimpiazzare il contenuto dell'Accumulator, si deve specificare il nuovo contenuto (65 in questo caso). In altre parole: l'operazione che comincia con 169 è lunga 2 byte e il secondo byte (anche detto operando, ing. operand) specifica il nuovo contentuto dell'Accumulatore. E quì c'è un esempio per l'opcode 173: 173 40 2 In questo caso l'operazione è lunga 3 byte e gli ultimi due byte (ovvero, l'operando) specifica l'indirizzo della cella dove si trova il nuovo valore dell'Accumulatore. In questo caso la cella 2:40. Sì, l'ordine è invertito e questo potrebbe causare confusione all'inizio, ma ci si abitua in fretta. Se guardi alle due sequenze di byte sopra, puoi notare che non è per nulla chiaro che fanno qualcosa di simile (ovvero, rimpiazzare il contenuto dell'Accumulatore). Inoltre, in un programma lungo, composto da molte operazioni, non è immediato capire dove cominciano le operazioni e controllare che tu abbia fornito il numero corretto di byte come operandi. Per esempio in questa sequenza: 169 40 2 Forse volevi caricare l'Accumulatore dalla cella 2:40. Ma, ovviamente, la CPU non può indovinare quello che volevi fare; caricarebbe l'Accumulatore con il valore 40 e poi bloccherebbe la VM in quanto 2 non è un opcode valido. Il linguaggio Assembly è un metodo efficace di presentare i byte di un programma. Ogni operazione è chiaramente presentata in una singola linea, non importa che sia lunga 1, 2 o 3 byte. Il suo comportamento è specificato in modo non ambiguo usando il suo mnemonic e, se necessario, il suo operando. L'operando è poi formattato usando un motivo (ing. pattern) rigoroso. Il pattern è un modo compatto di esprimere la seconda parte delle due frasi riportare più sopra o, in gergo 6502, il modo di indirizzamento (ing. addressing mode).
I modi di indirizzamento in questo caso sono #n e n:n, dove n è l'abbreviazione di numero. Il foglio JBit-QS.pdf (in inglese) contiene una lista completa dei modi di indirizzamento della CPU. Non si può pretendere di capire cosa facciano dalla breve descrizione contenuta nel foglio, ma, anche senza capirli, si può comunque ottenere qualche informazione dal loro formato: il numero di caratteri in minuscolo è il numero di byte aggiuntivi richiesti dall'operazione. Ad esempio, il modo di indirizzamento n:n,X richiede 2 byte in aggiunta all'opcode. L'Assembly, come ogni linguaggio di programmazione e a differenza dei linguaggi naturali, è un linguaggio formale (ing. formal language) e ogni piccolo dettaglio è importante. In Assembly, persino la punteggiatura è critica. Le operazioni LDA #65 (ovvero 169 65) e LDA 65 (ovvero 165 65) sono completamente differenti (la seconda, se si ignora che è più corta e più veloce, è identica a LDA 0:65). Seleziona LDA #n dalla lista. 169 viene inserito, il cursore viene posizionato sulla prossima cella e la modalità ritorna a EDT MEM. |
|||||||||
|
|
Premi 6, 5 e * per inserire l'operando. Premi # per passare alla modalità EDT ASM. Premi 7 (pqrS), 8 (Tuv) e 2 (Abc). |
|||||||||
|
|
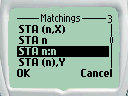
STA è lo mnemonico di STore Accumulator (it. immagazzina l'accumulatore) ed è in un certo senso l'opposto di LDA: rimpiazza il contenuto di una cella con il contenuto dell'Accumulatore. Il foglio JBit-QS.pdf (in inglese) contiene la lista completa degli mnemonici della CPU. Di nuovo, non si può pretendere di capire il significato di tutti gli mnemonici dalle brevi descrizioni contenute nel foglio ma, persino senza guardare la lista, dovresti già essere in grado di indovinare il significato di alcuni mnemonici (LDX, STX, LDY, STY, INY, DEX and DEY). Seleziona STA n:n dalla lista. 141 viene inserito, il cursore viene posizionato sulla prossima cella e la modalità ritorna a EDT MEM. |
|||||||||
|
|
Premi 4, 0 e * per inserire il primo byte dell'operando (ovvero lo spostamento). Premi 2 e seleziona OK per inserire il secondo byte dell'operando (ovvero la pagina). Premi # per passare alla modalità NAV ASM. |
|||||||||
|
|
Quì c'è la vista Assembly del programma completo: LDA #65 STA 2:40 BRK Riassumendo:
Seleziona Debug per provare il programma. |
|||||||||
|
|
Premi 1 per avanzare di un passo. L'Accumulatore ora contiene 65 e il Contatore di Programma 3:2. Premi 1 per avanzare di un altro passo. Il Contatore di Programma ora contiene 3:5. Puoi controllare che il carattere A è visibile sullo schermo della VM premendo # e poi tornando alla vista CPU premendo di nuovo #. Seleziona Abort per terminare il programma e ritornare all'Editor. |
|||||||||
|
|
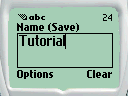
All'inizio probabilmente scriverai programmi molto corti e salvare i tuoi prograssi non dovrebbe essere una priorità. Anzi, ripartire ogni volta da zero potrebbe aiutarti a consolidare quello che hai imparato. Se però in futuro cominci a scrivere programmi più longhi, ecco come li puoi salvare: Seleziona Save (it. Salva), digita Tutorial e seleziona OK. |
|||||||||
|
|
Seleziona Back (it. Indietro) seguito da Exit (it. uscita) per terminare JBit e riavvia JBit. JBit è un sistema modulare e può essere configurato includendo più o meno strumenti, a seconda delle limitazioni del tuo cellulare. Il menù principale elenca quali strumenti sono stati inclusi. In questo tutorial stò usando JBit1M, una versione di JBit pensata per cellulari vecchi e include solo 2 strumenti: lo Store (it. magazzino) e l'Editor. Abbiamo già usato l'Editor e fra breve useremo lo Store ma prima, introdurro un paio di strumenti che probabilmente hai inclusi nella tua versione di JBit:
Una cosa importante da capire è che gli strumenti operano sul programma corrente. A differenza della maggior parte delle applicazioni per PC, JBit può lavorare solo su un "documento" alla volta; se esegui un demo o carichi un programma, il programma su cui stavi lavorando sarà rimpiazzato silenziosamente, anche se non era stato salvato. Magari ti stai chiedendo perchè c'è uno strumento Paint, se lo schermo della VM non può mostrare immagini. Il motivo è che è possibile equipaggiare la VM con differnti versioni dell'IO chip:
La versione MicroIO non va sottovalutata. Puoi impararla rapidamente ed è così semplice che non hai bisogno di consultare un manuale per usarla. Anche se hai a disposizione una versione migliore, scrivere programmi con in mente la versione MicroIO è un'ottima idea. Seleziona Store. |
|||||||||
|
|
Lo strumento Store ti fornisce un contenitore dove puoi tenere i tuoi programmi per modifiche successive. Hai già usato lo strumento Store senza nemmeno rendertene conto, quando hai salvato il programma all'interno dell'Editor, ma accedervi manualmente dà più possibilità. L'elenco dei programmi salvati ti viene mostrato e puoi usare alcuni comandi per gestirli. Load&Edit (it. Carica&Modifica, l'azione di default) carica un programma e lancia l'Editor. Load&Run (it. Carica&Esegui) carica un programma e lancia la VM. Load (it Carica) semplicemente carica un programma. Save (it. Salva) chiede il nome del programma corrente e lo salva. Non puoi sovrascrivere un programma esistente usando Save; per questo devi sare Overwrite (it. Sovrascrivi). Info, Copy (it. Copia), Rename (it. Rinomina) e Delete (it. Cancella) fanno più o meno quello che ti aspetti. Non cambiano il programma corrente. Quando aggiorni JBit ad una nuova versione, il cellulare dovrebbe chiederti se vuoi conservare i suoi dati ed è importante rispondere di SI' per conservare i programmi che hai salvato. Le parole esatte della domanda variano da cellulare a cellulare. Seleziona Tutorial. |
|||||||||
|
|
Ecco una breve sessione di programmazione, come ripasso:
Seleziona Back e poi Exit per terminare JBit. |