Gallery Download Tutorial About
![]()
JBit has been designed from the beginning so that you don't have to be a Java programmer to tinker with it.
This page is a step by step guide on how to repackage JBit to suit your mobile phone or to allow the redistribution of custom MIDlets. You need a text editor and a program capable of modifying jar (i.e. renamed zip) files. I assume you are working on Windows XP and you have 7-Zip installed, but the techniques presented here should be easy to adapt to other platforms or tools.
The runtime is included in the SDK and allows the distribution of custom JBit programs.
Copy the jad/jar files you want to start with into a newly created directory and open the newly created directory with the 7-Zip File Manager.

Rename the jad/jar files into something appropriate (select Rename from the context menu and enter the new name); in this example we will use Bounce.jad and Bounce.jar.
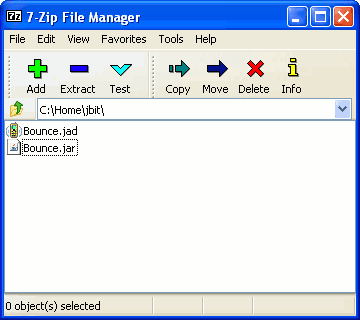
Enter into the jar file (double click).

The files ending with .class are binary files containing the code of the emulator. The file ending with .jb is a binary file containing a JBit program. The file icon.png is, you have guessed it, the icon. JBit is pretty conservative and comes with a 15x15, opaque, grayscale image; if you want to create your own icon, the web sites of the manufacturers usually have sections dedicated to the developers where you can find the suggested format for a given device.
Remove the included JBit program (select Delete from the context menu and confirm); in this example the file to remove is dpyinfo.jb.

Drag another JBit program into the 7-Zip window; in this example we will use bounce.jb (included in the SDK).

Enter into the META-INF folder (double click).

The file MANIFEST.MF is a text file containing essential information for the MIDlet. Edit it (select Edit from the context menu).

You can see a list of properties; each property is in its own line and is formatted as Name: Value.
Some properties must be left unchanged (they are marked in red in the screenshot below):
Some other properties should be changed (they are marked in yellow in the screenshot below):

Save, close, confirm the changes and go back to the directory (click twice on the folder with a green arrow on it).
On some devices only the jar file is necessary and this is now ready to be provisioned; some other devices need a jad file too.
To update the jad file first you need to find out the size of the jar file (select Properties from the context menu).

The relevant field is Size (not Size on disk!); in this example the size turned out to be 18620 bytes.
You can now edit the jad file (select Edit from the context menu).
A jad file is very similar to the MANIFEST.MF file that you have edited before and should be modified in the same way; some properties are missing and some more properties should be changed (they are marked in yellow in the screenshot below):
MIDlet-Jar-URL should point to the location of the jar file; in this example Bounce.jar (if the jad and the jar files are both in the same directory there is no need to write the full URL). MIDlet-Jar-Size should be updated to match the value you have found before; in this example 18620.

Save and close.
Congratulations! Your MIDlet is now ready to be redistributed.
There are less things that can go wrong when repackaging the runtime, so I advise you to try to do that first. In this section, I assume that you already understand the repackaging process and I skim over the details.
JBit is fairly flexible and here I only present a couple of examples to give you an idea of what is possible.
JBit1M is a version of JBit targeting very old phones (i.e. MIDP1 phones with limited heap space).
JBit2P is a version of JBit with the sample Paint module included. Note that JBit2P is bigger than 64K and on some phones it cannot be installed OTA.